f-kuzey-edes-huyal/steam-sale-optimizer
An MLOps pipeline for optimizing game discount strategies using Steam reviews, tags, and competitor pricing. Designed for data-driven revenue maximization in the gaming industry.
🧩 Problem Definition
Steam is one of the most popular digital distribution platforms for PC gaming, known not only for its vast library of games but also for its seasonal discounts. While discounts drive traffic and increase sales, they also present a strategic pricing challenge:
-
Too steep a discount might undermine revenue potential.
-
Too small a discount might deter potential buyers altogether.
In this project, I aim to develop a data-driven pipeline to suggest optimal discount percentages for Steam games by analyzing publicly available Steam data and enriched third-party sources.
Game developers and publishers often face uncertainty when deciding on discount strategies. The ideal discount should balance increased sales volume with preserved revenue margins. However, Steam does not directly provide ownership or purchase volume data, which is critical for such analysis.
To tackle this, I created an end-to-end MLOps pipeline that:
-
Scrapes game pricing, rating, and tag-related data directly from the Steam Store.
-
Enriches the dataset using SteamSpy, a third-party service that estimates number of owners (a proxy for sales volume).
-
Used four regressor models with different hyperparameters. Tracked all experiments with MLflow for the case with and without user reviews.
-
Best model based on mean absolute error is registered with MLflow.
-
Apache Airflow used to orchestrate all steps. One DAG handles everything. Isn’t that cool? From scraping to cleaning to deployment, it’s all there. You just need to trigger one file to run the whole pipeline.
-
Used Evidently and Grafana for drift monitoring.
-
Model deployed to the cloud using Microsoft Azure: Cloud Computing Services
-
CI/CD pipeline set up with GitHub Actions. Unit and integration tests applied
-
Infrastructure handled with Terraform. The repo is cloned into Azure Cloud, and all containers are built there to repeat the experiment on the cloud platform.
📊 Data Overview
This Python script steam_scraper_new_trial.py includes functions to scrape the most important game-level features from the Steam store: https://store.steampowered.com/.
"game_id", "name", "release_date", "release_year" "total_reviews", "positive_percent" , "genres", "tags", "current_price", "discounted_price"
The script steamspy_scrape.py contains functions to extract additional metadata from SteamSpy, using the endpoint: https://steamspy.com/api.php?request=appdetails&appid={appid}
The most critical feature retrieved here is "owners", which indicates the estimated number of game owners.
Additionally, the review_scraper.py script scrapes user reviews from the Steam platform. These reviews will later be used in a multimodal analysis, combining both tabular features and textual data.
Together, this pipeline integrates three sources of data using the functions defined in:
python scripts\main_scraper1_new_features.py
By running the code below, you will combine the reviews (reviews.csv, the number of owners scraped from SteamSpy (steamspy_data.csv, and other game features using an SQL query (steamdata.csv. Additionally, the query will exclude free-to-play games, as they are not suitable for our analysis.
Before running the script, make sure to execute your SQL schema (e.g., via pgAdmin or a similar tool) to create the necessary database and grant access permissions.
python scripts\load_combine_exclude_freegames.py
🛠️ Automated Data Collection and Merging Using Apache Airflow
Before accessing the Airflow UI, make sure you have built and started the Docker containers using docker-compose up --build. Then, you can visit http://localhost:8080 to view and trigger your DAGs in the Apache Airflow UI.
The DAG file orchestrates the data scraping and combination process by calling two scripts: airflow_main_scraper1_new.py and load_and_combine_new.py. These scripts scrape the required game data, combine three datasets using SQL, and exclude free-to-play games from the final output.
The figure below shows how to trigger your DAG.

The figure below shows a successfully run DAG.

🧪 Experiment Tracking with MLflow
First, activate your virtual environment in your terminal and run the command below to start the MLflow UI:
mlflow ui --backend-store-uri sqlite:///mlflow.db
Next, open a new terminal window, activate your virtual environment again, and run your experiment tracking code.
python scripts\train_last.py
Access your MLflow experiments by navigating to http://127.0.0.1:5000 in your browser to visualize and manage your experiment tracking
![]()
I observed a 14% improvement in mean absolute error for the small training sample size when including competitor pricing and review scores, compared to the experiment where these features were not included.
Don't forget to activate the virtual environment (venv\Scripts\activate) when working locally instead of using Docker containers.
🗃️ Model Registry
Instead of selecting the model for registration within the training script, you can register the model separately using mlflow.register_model.
While your MLflow tracking server is running, open a new terminal and execute the code below to register your model.
python scripts\model_registry_final.py
By clicking the link http://127.0.0.1:5000/#/models, you can view your registered models.

Note: Model registration is not the same as deployment, but it allows you to prepare the model for future deployment or serving.
🛠️ Orchestrating Experiment Tracking and Model Registry with Apache Airflow
To orchestrate experiment tracking and model registry, trigger the dag_experiment_tracking_model_registry.py script, which defines the DAG with dag_id="discount_model_training_pipeline_new".
Besides triggering it from the Apache Airflow UI, you can also run it directly from the Docker container using the following line:
docker exec -it steam-sale-optimizer-airflow-scheduler-1 airflow dags trigger discount_model_training_pipeline_new
📈 Monitoring Data Drift
Run the following code to perform monitoring:
docker exec -it steam-sale-optimizer-postgres-1 psql -U postgres
CREATE DATABASE monitoring_db;
docker exec -it steam-sale-optimizer-airflow-scheduler-1 python scripts/monitoring_extensive_graphs.py
Adminer Login Instructions
Go to: http://localhost:8081
Use the credentials from your .env file:
- System: PostgreSQL
- Server:
postgres - Username:
${POSTGRES_USER} - Password:
${POSTGRES_PASSWORD} - Database:
${POSTGRES_DB}

🔧 Accessing Grafana
Open your Grafana service: http://localhost:3000
Log in using the credentials you set in your .env file before building the Docker images:
- Username:
admin - Password:
admin
The new_drift.json file provides the Grafana dashboard layout. When you visit http://localhost:3000, you will see the dashboard as shown below.
You will see the dashboard by going to: Home → Dashboards → Model Monitoring → Model Monitoring Dashboard.

📦 Model Deployment
To deploy the model, you should run the code below.
uvicorn main_new:app --reload
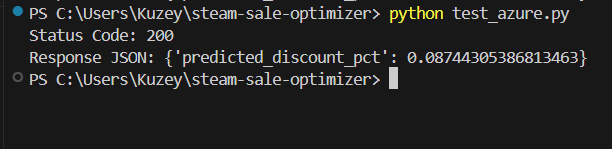
Then, test your model locally by:
python test.py

Figure: Testing the FastAPI model locally
I have created a lighter Docker image to deploy my model using a separate Dockerfile. To build and run this Dockerfile, and then push the image to Docker Hub, follow the steps below:
docker build -t fkuzeyedeshuyal/deployment-d -f Dockerfile.deployment .
docker run -p 8000:80 fkuzeyedeshuyal/deployment-d
python test.py
docker login
docker push fkuzeyedeshuyal/deployment-d
🚀 Deployment to the Cloud (Azure)
The following steps show how to deploy the FastAPI application using Azure CLI:
az login
az group create --name myResourceGroup --location westeurope
az appservice plan create --name myAppServicePlan --resource-group myResourceGroup --sku B1 --is-linux
az webapp create --resource-group myResourceGroup --plan myAppServicePlan --name kuzey-ml-app --deployment-container-image-name fkuzeyedeshuyal/deployment-d:latest
az webapp show --resource-group myResourceGroup --name kuzey-ml-app --query defaultHostName -o tsv
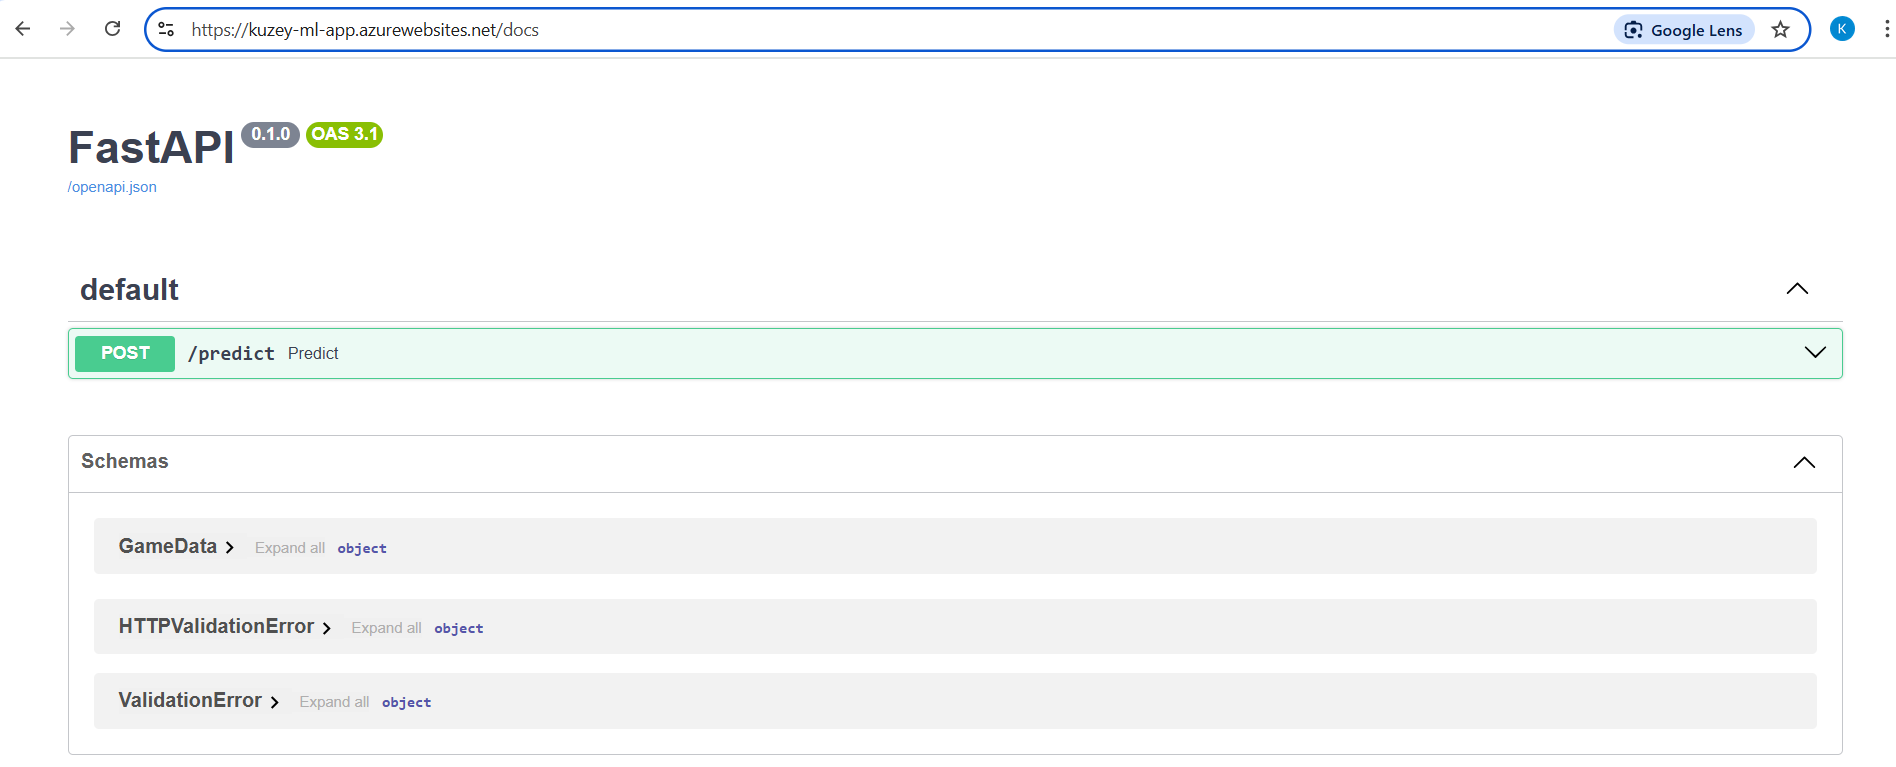
This will give you the URL: https://kuzey-ml-app.azurewebsites.net. By adding /docs to the end of the URL — like this:
👉 [https://kuzey-ml-app.azurewebsites.net/docs] — you can view the interactive FastAPI Swagger UI for your deployed app.
The model was successfully deployed to Azure App Service using a custom Docker image.
⚠️ Important:
Don't forget to delete the Azure resources you created after your work is complete to avoid additional charges.
You can do this by running:
az group delete --name myResourceGroup --yes --no-wait
🚀 Orchestrate Deployment with Apache Airflow
I prepared a DAG file named fastapi_deployment_dag.py with the URL set to "http://fastapi-app:80/predict". After triggering the DAG from the Apache Airflow UI, I ran the test script inside the Docker container to verify the FastAPI deployment.
docker exec -it steam-sale-optimizer-airflow-scheduler-1 bash
python scripts/test_docker.py
🚀 Full Orchestration with Apache Airflow
I used the script named you_have_to_live_before_you_die_young_dag.py. This DAG now needs to be triggered.
docker exec -it steam-sale-optimizer-airflow-scheduler-1 airflow dags trigger you_have_to_live_before_you_die_young_dag
The figure below demonstrates the successful execution of the full orchestration DAG.

Note: While working on this pipeline, I mistakenly mounted some files incorrectly while trying to orchestrate it using Apache Airflow. Each time I did this, I had to run docker-compose down and rebuild the containers, which forced me to reinstall all the packages — countless times. This was very inefficient, especially during periods of poor internet connectivity.
Thanks to discussions with Ulaş Huyal, I found a better approach. With the code snippet below, I no longer need to reinstall all packages every time I fix a mount issue:
docker-compose down --volumes --remove-orphans && docker-compose up --build -d
🧪🔗 Unit & Integration Testing
Added unit tests to verify core utility functions including price parsing, review text transformation, and mean absolute percentage error calculation to ensure data processing and metric computations are accurate.
Run the code below to successfully apply the unit tests
pytest -s tests/test_train_and_log.py
The unit test file (test_main.py) provided with a code line below, checks two critical API endpoints in your FastAPI app. The test_reload_model function ensures the /reload_model route returns a success message and status code 200, verifying the model is reloaded properly. The test_predict function submits a sample game data payload to the /predict endpoint and asserts that a float value for "predicted_discount_pct" is returned, confirming that the prediction pipeline is functioning as expected.
pytest -s tests/test_main.py
The DAG named fastapi_deployment_dag_integration_tests.py applies integration testing by automatically verifying the FastAPI deployment in the pipeline. After deploying or reloading the model on the FastAPI server, the DAG sends real HTTP requests with test data to the /predict endpoint. It checks the response status and output correctness to ensure the entire system — from model loading to prediction serving — works as expected end-to-end. This helps catch issues early by testing the integration of all components involved in model deployment and serving.
I have also applied an integration test for the full orchestration DAG named you_have_to_live_before_you_die_young_dag.py.

⚙️📦 Terraform Configuration for Azure Infrastructure
When deploying multiple containers to the cloud, Terraform is extremely helpful for provisioning and managing your infrastructure. Here are three important points from my experience using Terraform:
-
First, when creating the environment to construct containers via Terraform, I cloned my GitHub repository. However, I needed to copy my local .env file separately because it was not included in the repository.
-
Second, the Docker version installed on the Azure virtual machine was outdated. I had to remove the old version and then install the correct, updated Docker version to ensure compatibility.
-
Third, I encountered errors related to Docker credentials. To fix this, I removed the Docker credential helpers and created a separate markdown file inside the Docker folder to document these changes.
Although I mainly worked outside of cloud platforms before, I demonstrated that I can build and manage containerized infrastructure on cloud platforms using Terraform.
The main Terraform code for using the Azure platform looks like that, but I could not stay with it as it was not as easy as just five lines. I have prepared terraform.md inside the terraform folder.
| Command | Description |
|---|---|
az login |
Log in to your Azure account |
cd terraform |
Change directory to terraform |
terraform init |
Initialize the Terraform config |
terraform plan |
Preview the changes to apply |
terraform apply --auto-approve |
Apply changes without prompt |
Use your VM’s public IP and the ports you mapped in your docker-compose file. For example:
Airflow Webserver: http://<your-vm-public-ip>:8080
MLflow: http://<your-vm-public-ip>:5000
Adminer: http://<your-vm-public-ip>:8081
Grafana: http://<your-vm-public-ip>:3000
FastAPI app: http://<your-vm-public-ip>:8082
terraform destroy --auto-approve
🚀 CI/CD Pipelines with GitHub Actions
This project uses GitHub Actions for automated testing, linting, and deployment. Every push or pull request to the main branch triggers a pipeline that builds Docker containers, runs unit tests for the FastAPI app, and checks code quality.
🐳 How to Run Docker Containers
Follow the steps below to run Docker containers. You do not need to activate a virtual environment for Docker experiments.
git clone https://github.com/f-kuzey-edes-huyal/steam-sale-optimizer.git
cd steam-sale-optimizer
docker-compose up --build
🛠️ How to Set Up the Environment for Local Runs
Be sure you have Python 3.10.16 installed in your system
Clone the repo to your local machine.
git clone https://github.com/f-kuzey-edes-huyal/steam-sale-optimizer.git
Change directory into the project folder.
cd steam-sale-optimizer
Create a virtual environment named venv.
python -m venv venv
Open the project in Visual Studio Code.
code .
Activate the virtual environment.
venv\scripts\activate
Upgrade pip to the latest version.
python -m pip install --upgrade pip
Install Required Dependencies:
pip install -r requirements_windows.txt
note: I didn’t include my own .env file for security reasons, but you can use the .env.template file in the repo as a starting point. Just rename .env.template to .env and fill in your own values before running the project.