EmenstaNougat/WiFiX-DualBand-Deauther
A 2.4GHz and 5GHZ Deauther, based on a RTL8720dn BW16 dev kit.
WiFiX-DualBand-Deauther - by @Emensta & ASP-29
Educational purposes only!


Make your own | Pinout | PCB's | Flashing | Gallery | Website
Features
- Deauth both 2.4GHz and 5.8GHz bands
- Choose to attack only 2.4GHz, only 5.8GHz, or both at once
- User-friendly flashing options
- Dedicated PCBs
- still in development, further updates are possible!
What is a Deauther?
A deauther is a device that sends deauthentication frames to disconnect devices from a WiFi network. It exploits a vulnerability in the 802.11 protocol, causing WiFi clients to disconnect temporarily or until they reconnect manually.
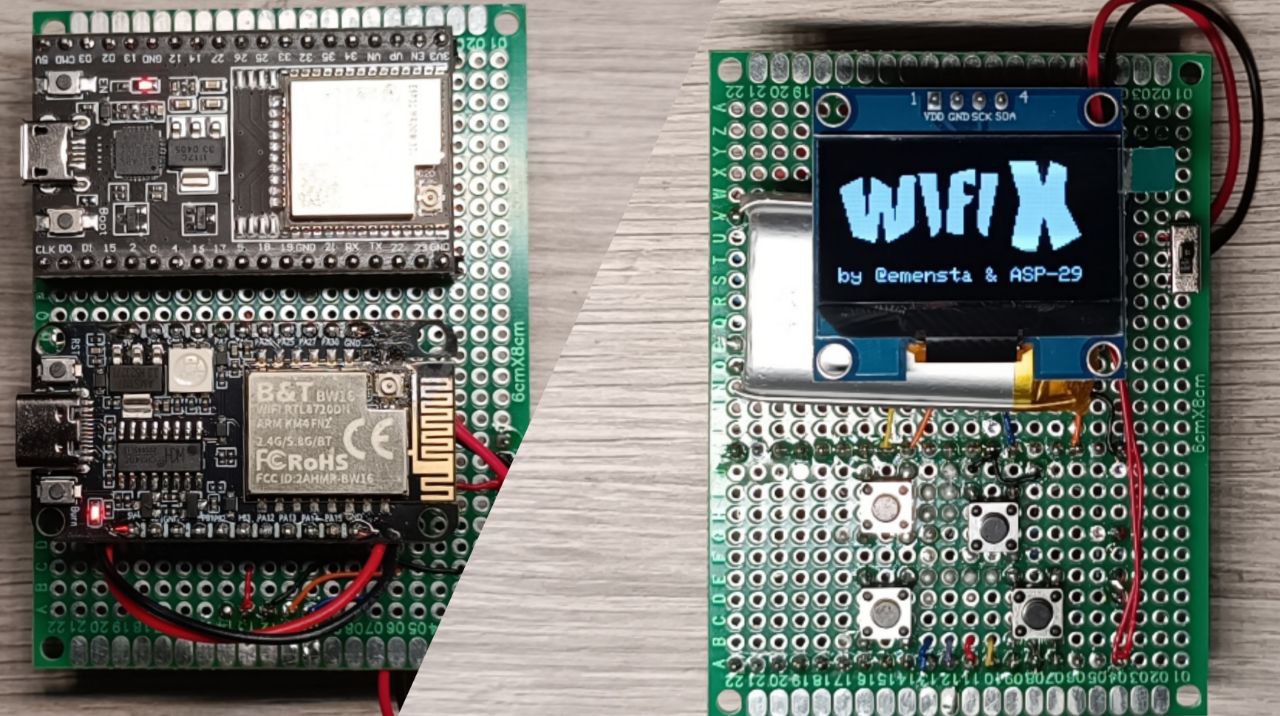
PCBs
WiFiX DIY-PCB:
The WiFiX DIY-PCB includes both, ESP32 and RTL8720DN to allow penetration testing for educational purposes!
Remember: It is not intended for illegal use!
For this one, all you need is listed below:
Required:
- ESP32 Dev Module (Recommended: ESP32-32U CP2102, any ESP32 should work as long as it has the needed pins, 38P required!)
- BW16 KIT RTL8720DN (With IPEX Back Weld)
- 1.3" OLED Display I2C
- Tactile Tact Push Button (4x)
- Slide switch
- U.FL IPEX connectors (2x)
- RP-SMA connector (2x)
- U.FL IPEX pigtail (2x)
- 2,4 GHz & 5,8 GHz 8 dBi antennas (2x)
- LED: 3mm LED
- Resistor kit
- R1 = 1kOhm
- R4, R6 = 100kOhm
- R5, R7 = 47kOhm
Additional:
- TP4056 Charging Module (Micro-USB/Type-C)
- Mini DC-DC Boost Module
- JST PH 2.0 Connector
- 3.7V Li-Ion Battery

Shop

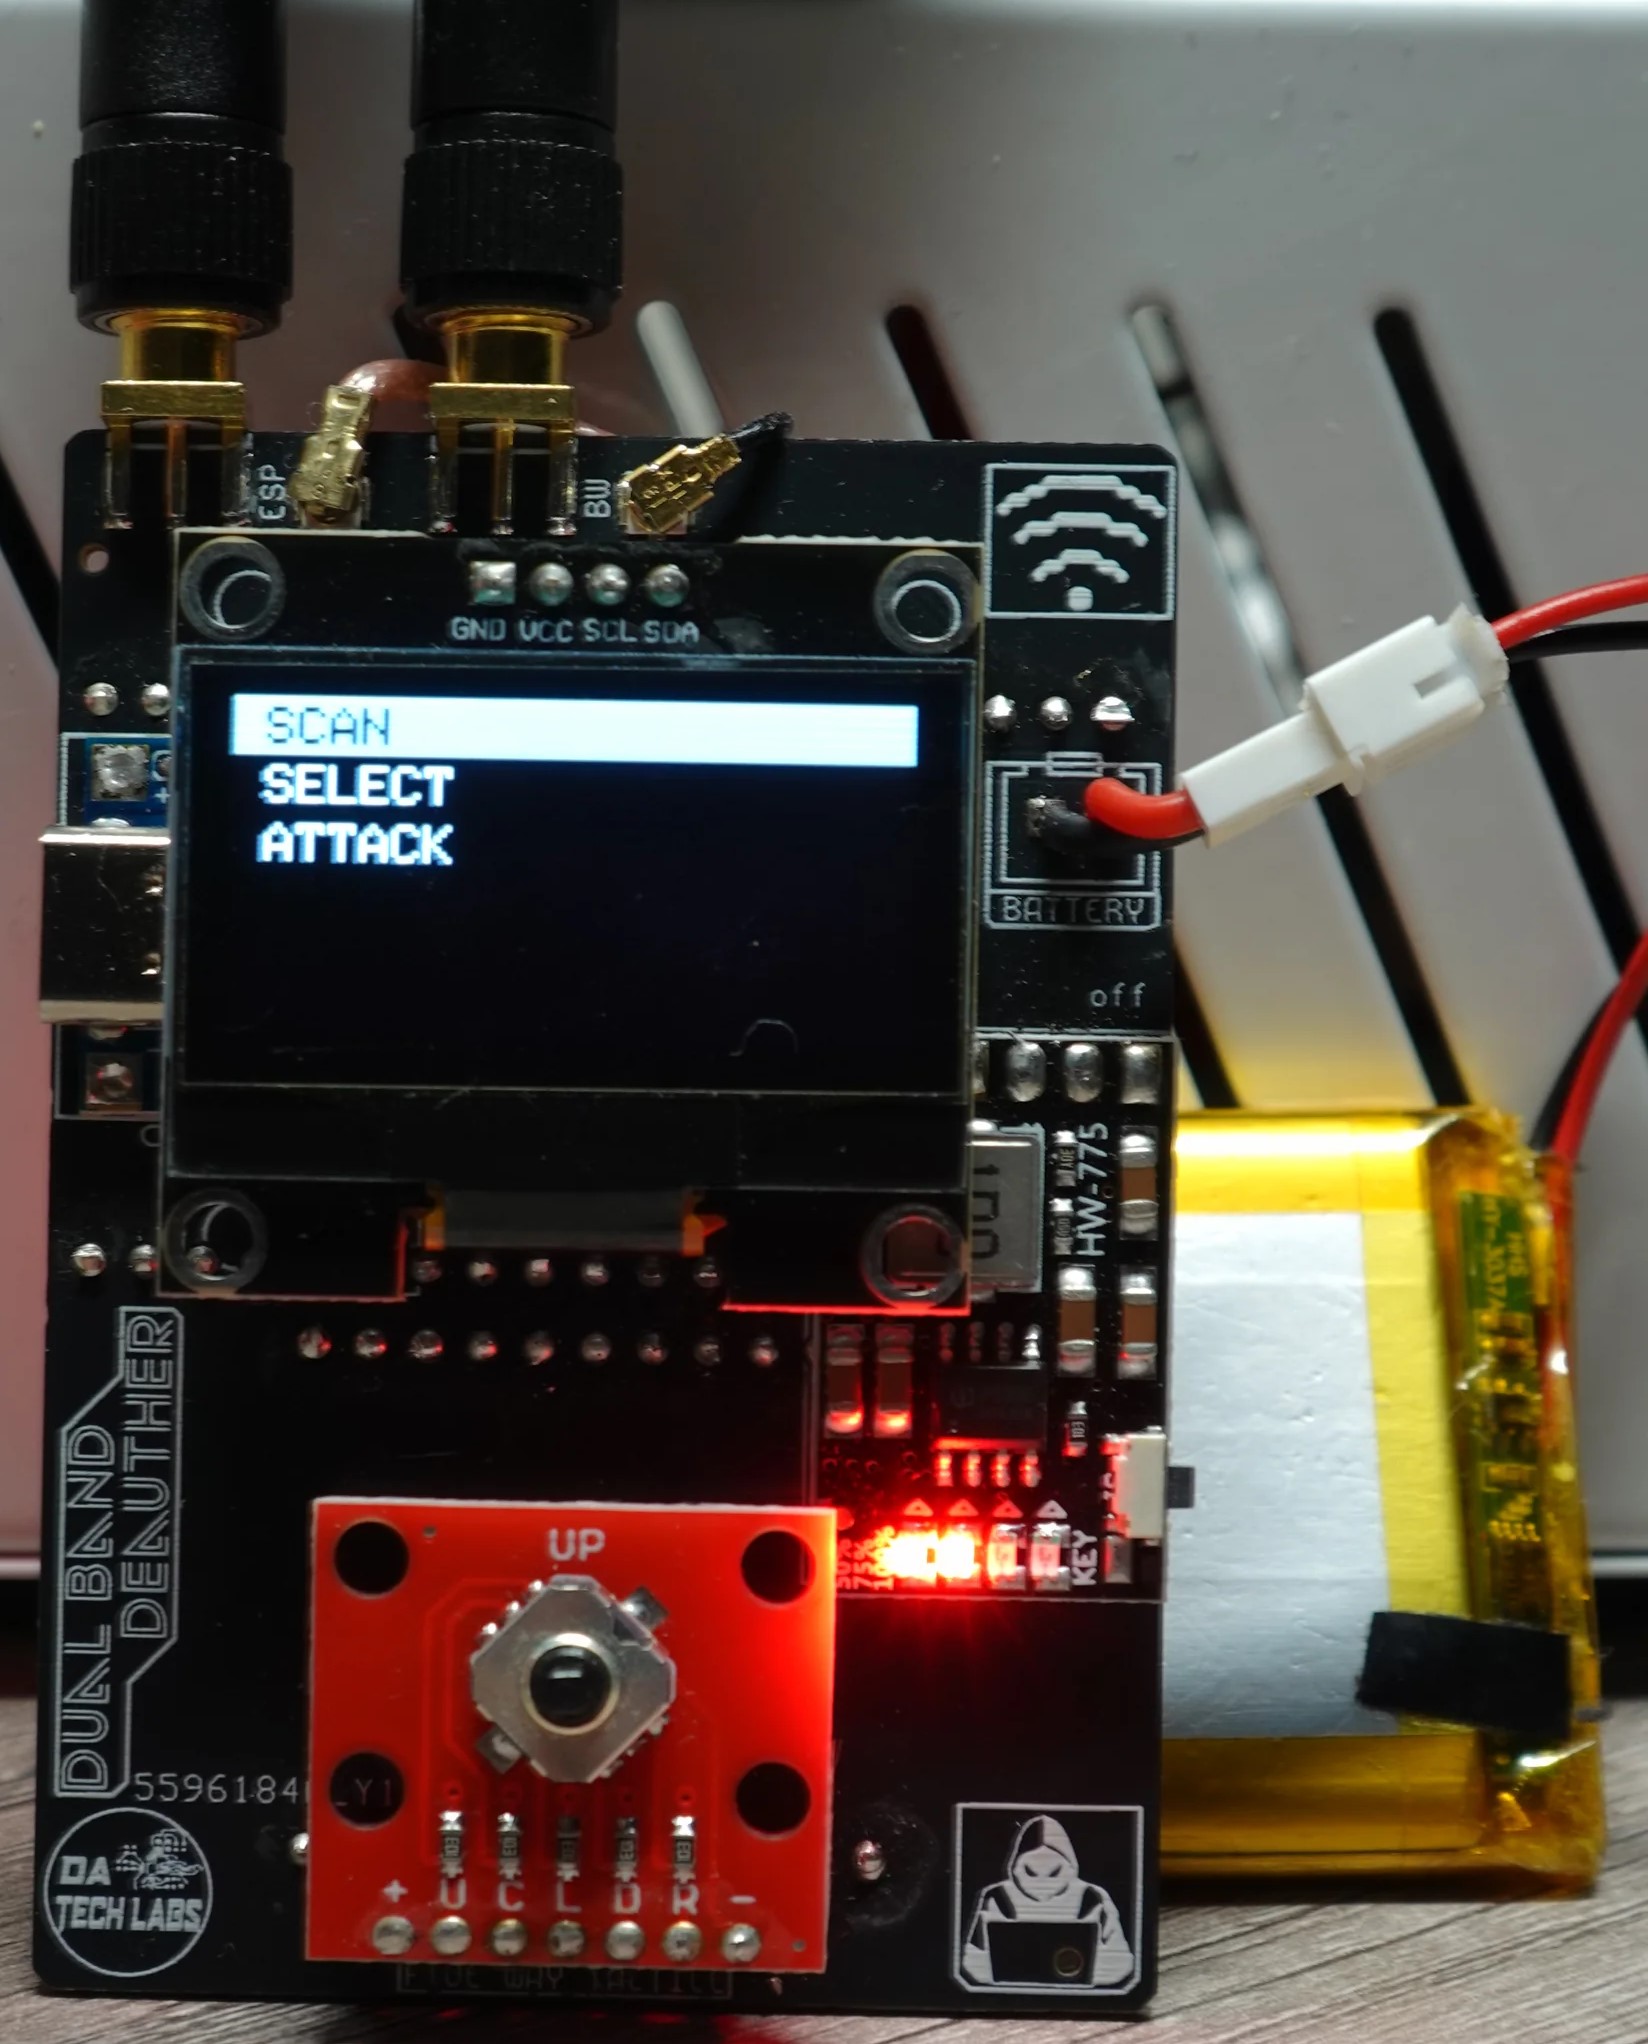
WiFiX-DualBand-Deauther PCB v1:
Remember: It is not intended for illegal use!
A second PCB design is in development and will be available soon.
Make Your Own
(Aliexpress affilate links to support me-linked to the item names)
To build your own WiFiX-DualBand-Deauther, you will need:
Required Components:
- ESP32 Dev Module (Recommended: ESP32-32U CP2102)
- RTL8720DN BW16
- 1.3" OLED I2C 128x64
- 4x Mini Tactile Buttons
- Prototype PCB
If you're looking to add a battery:
- 3.7V Li-Ion Battery
- JST PH 2.0 Connector
- TP4056 Charging Module (Micro-USB/Type-C)
- Mini DC-DC Step-Up-Converter
- Mini Slide Switch
Pinout
OLED
| OLED Pin | ESP32 |
|---|---|
| SCL | GPIO22 |
| SDA | GPIO21 |
| VDD | 3V3 |
| GND | GND |
Buttons
| Button | ESP32 | ESP32 |
|---|---|---|
| UP | GPIO25 | GND |
| DOWN | GPIO26 | GND |
| BACK | GPIO33 | GND |
| SELECT | GPIO32 | GND |
BW16
| BW16 Pin | ESP32 |
|---|---|
| PB1 | GPIO16 |
| PB2 | GPIO17 |
| 3V3 | 3V3 |
| GND | GND |
Charging Circuit
| 3.7V Li-Ion Battery | JST-PH2 Connector | TP4056 Charging Module | Mini Slide Switch | Step-Up Converter | ESP32 |
|---|---|---|---|---|---|
| (+) Battery | (+) JST-PH2 | Bat + | |||
| (-) Battery | (-) JST-PH2 | Bat - | |||
| OUT + | Switch in | ||||
| OUT - | IN - | ||||
| Switch out | IN + | ||||
| OUT + | 5V | ||||
| OUT - | GND |
Flashing the Firmware
The firmware for WiFiX-DualBand-Deauther can be installed using two different methods:
via WiFiX-Flasher (Easy)
Simply download the WiFiX-Flasher from the repository files and run the "WiFiX-Flasher-RUN_THIS.bat" file.
It will list all connected COM ports and give you the instruction and choise on which chip you want to flash.
Please remember to first flash your ESP32, then replug the wire physically and redo the process for the BW16 board!
via webflasher (Easy) - SOON
I've created a webflasher to make it super easy for you to flash your ESP32 chip with the ESP32-BlueJammer firmware of your choice!
- Visit SOON
- Connect your ESP32 via a data USB cable
- Choose your firmware, chip and connect
- Flash the firmware of your choice :D
Flashing ESP32 via binary files (Advanced)
- Download the .bin files available on this repository
- Use any flasher of your choice
- Flash it :D
Functions
The WiFiX-DualBand-Deauther comes with an intuitive menu system that provides easy navigation through its core functions.
Main Menu:
-
SCAN
- [BACK]
- SCAN APs 2.4GHz
- SCAN APs 5GHz
- SCAN Stations
- SCAN AP 2.4GHz + ST
-
SELECT
- [BACK]
- APs 2.4GHz
- APs 5GHz
- Stations
- SSIDs
-
ATTACK
- [BACK]
- DEAUTH
- BEACON
- BEACON RANDOM
- START
-
TOOL
- [BACK]
- DEAUTH DETECTOR
- FIND HIDDEN SSID
-
LOG
Webserver
After powering the device, an AP will appear called "WiFiX32", the password to access it is "exploit32".
Thanks to this you will be able to control it by using a web interface.
Open a browser of your choice and visit 192.168.1.1 (standard - you can change all settings!)
Gallery


Discord
You can join my Discord server here!
Portfolio and all my links
Here you can visit my Portfolio, you'll find everything that you're looking for here!