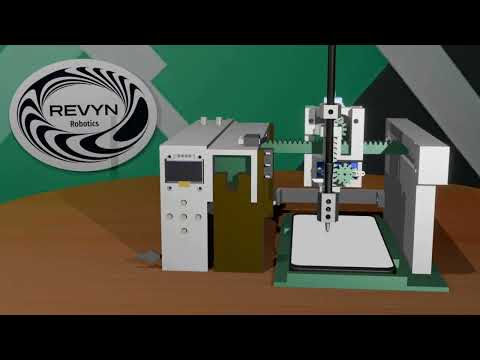
Cartesian Robot Controller
YouTube demo video: Watch Here
3D Model & Print files: Purchase here Files on CGTrader
Or find a free pack here: Brevengineering Drive
This Arduino firmware controls a Cartesian robot with two stepper motors and a servo, featuring manual, auto, and programming modes with an OLED display UI.
Features
Menu system: Switch between Manual, Programming, Auto, and Homing modes.
-
Manual mode: Direct motor control via analog potentiometers.
-
Programming mode: Record and save motion sequences (X, Y, servo states, wait times) to EEPROM.
-
Auto mode: Execute saved programs with options to run once, twice, or loop forever.
-
Homing function: Moves robot to home position using limit switches.
-
Servo control: Operates servo with discrete positions and quick tap.
-
EEPROM storage: Save/load up to 3 programs (each 10 steps max).
-
OLED Display: Visual feedback for mode selection, program editing, and status.
Hardware Requirements
-
This project requires an Arduion MEGA to support the code data size and to have enough I/O pins for all the inputs and motors.
-
Two stepper motors with compatible step drivers (controlled via motor1 and motor2 objects). I used 2 5V 28BYJ-48 Steppers with ULN2003 Drivers
-
Servo motor connected to myservo. I used a higher quality 21G Mini Digital Servo
-
OLED display compatible with display object. SSD1306 LCD
-
Limit switches on pins lim1 and lim2 for homing.
-
Potentiometers connected to readpot1 and readpot2 for manual control.
-
Push buttons connected to digital pins p1, p2, p3, p5, p6 for UI navigation and actions.

You can find the BOM and more details here on my portfolio site
Software Structure
-
States: MENU, MANUAL_M, AUTO_M, PROGRAMMING, HOMING.
-
Main loop: State machine switching behavior and UI updates.
-
Movement functions:
-
movemotorsman(): Reads pots and moves motors manually with velocity control.
-
trajmove(x, y): Moves robot along a trajectory toward a target position with max velocity limit.
-
home_fun(): Homing routine using limit switches.
-
Servo function: runservo() sets servo position or quick tap.
-
EEPROM functions: readArrayFromEEPROM() and saveArrayToEEPROM() to persist programs.
-
Data:
-
progArray[ROWS][COLS] holds motion sequences.
-
Various tracking variables for motor positions, velocities, and UI states.
Usage
-
Power on: Robot starts in MENU.
-
Navigate modes:
-
p1 → Manual mode
-
p2 → Programming mode
-
p6 → Auto mode
-
p3 → Home robot
-
Manual mode: Control motors with pots, buttons control servo.
-
Programming mode: Record steps, save or restart sequences.
-
Auto mode: Select program to run, set run count, start automated moves.
-
Homing: Moves motors until limit switches triggered.
Constants & Limits
-
Stepper position limits: min1step, max1step, min2step, max2step.
-
Max velocity capped in trajmove().
-
Max wait time in programming mode: 15 seconds.
How to Use
Hardware Setup
Connect your Arduino board to your Cartesian robot following your wiring schematic:
-
Stepper motors connected to motor drivers.
-
Limit switches wired to appropriate digital pins.
-
Servo connected to the specified PWM pin.
-
Potentiometers connected to analog inputs for position feedback.
-
OLED display connected via I2C (SDA, SCL).
Make sure power supply ratings match your motors and electronics.
Software Setup & Upload
Install Arduino IDE: Arduino IDE Download
Download and install the Arduino IDE if you don’t have it.
Add Required Libraries
Make sure to install the necessary libraries, such as:
- Servo.h
- Stepper.h
- EEPROM.h
- Adafruit_GFX.h
- Adafruit_SSD1306.h
Open the Sketch
Open the provided .ino file in the Arduino IDE.
Select Board and Port
In the IDE, go to Tools > Board and select your Arduino MEGA
Then go to Tools > Port and select the port your Arduino is connected to.
Upload the Code
Click the Upload button (right arrow icon) in the IDE.
Wait for it to compile and upload to the Arduino.
Running the Robot
-
Once uploaded, power on the robot.
-
The OLED display will show the main menu.
-
Use the buttons to navigate between modes: Manual, Programming, Auto, and Homing.
-
Follow on-screen prompts to move motors manually, program trajectories, or run saved programs.
Notes
-
Delay-based timing used (not real-time).
-
Assumes motor1, motor2, myservo, display initialized externally.
-
UI depends on specific pin mapping for buttons and sensors.
-
Check out my portfolio site